
Well hey there, Travelpreneurs! Today, let's talk about a handy-dandy feature called Landing Pages, and how you can build a killer page for yourself in 15 minutes or less!
As I mentioned in my last post, I have committed to only writing and publishing posts here on the site that are detailed, thorough, and posts I think will actually really benefit my readers.
I don’t want to bore you with ultra-long posts talking about things you already know or telling you how to do things that don’t even apply to you.
As entrepreneurs, I think we can all agree that every minute of the working day is precious, so without further ado, let’s get into it!

How to Set Up a Static Landing Page on Squarespace (with Cover Pages)
Before we get too far into this tutorial, let’s make sure we’re on the, ahem, same (landing) page.
Oof, bad pun, I’m sorry.
Today we'll be building an entire landing page together, and I'm willing to bet you'll be able to knock this thing out in 15 minutes or less!
Does that get you stoked, or what? (Hopefully you said “YES, Christy! I’m SO excited!”, right?)
So, let’s talk about landing pages and why they’re so dang important
I’m crazy passionate about using landing pages on your site. In fact, whether you’ve got a fully-functioning site that’s been running for years, or you’re just starting out and haven’t even written any content for your fledgling site yet, I think you should have a landing page!
Put another way, you should be using landing pages on your site whether you have YEARS of content on your site, or ZERO content on your site!
Why?
Well, there are lots of reasons why I think landing pages are such an important part of successful and high-converting websites.
I could talk to you for hours about the spike in click-through rates, the internal referrals you’ll see, the sleek and minimal look it gives your site, and the credibility it instantly lends to any site.
But the main reasons I believe landing pages are so important are really simple…
1) A landing page can direct your readers to the exact spot you want them to go or action you want them to take upon reaching your site!
2) A landing page can effectively do the work of an entire website for you with just one static page!
3) THEY ARE EASY AS ALL GET-OUT TO BUILD!
So let’s elaborate on those points a little bit before I walk you through the process of building your landing page with Squarespace.
Want to learn more about building a killer website? Get the FREE Guide here!
LANDING PAGES GIVE DIRECTION TO YOUR READERS
When people show up on your site for the first time (or second, or third, or hundredth time, even!), they may not always know exactly where to go.
Do they check out the About page? Do they peruse your blog? What about all those awesome free resources you’re offering? Should they start there?
On the other hand, if you’re just starting out with your online presence, you may not even have a site prepared yet, so your online people REALLY won’t know what to do! If the prospect of building an entire site seems daunting to you, this is exactly why you need a landing page!
So what should a good landing page look like, exactly?
Let’s use the wonderful Mariah Coz as an example here. Her website, Femtrepreneur, puts you on a landing page upon arrival. I love her landing page because it is simple, direct, and it points you in one of two important directions, to get you exactly where she wants you to go.

If you look at her landing page, you'll see she gives a short little description about her new accelerator program, and then gives you only two options: you can read more about the program, or you can click through to her blog.
What Mariah has done here is a perfect example of how you can lead your readers to precisely where you want them to go. Because she knows that the two most important things she has to share with her readers are her program and her blog, she makes it easy for you to get to both places by giving you focused, succinct, and simple options.
This is what I'm talking about when I say that a good landing page is absolutely essential to direct your readers where you want them to go.
Ultimately this will help out your readers AND you! They get to read the content they want, and you get to point them towards your most useful content or products!
LANDING PAGES ARE STAND-ALONE WEBSITES
Another reason that landing pages are so incredible is that, depending on what you need from a website, you might not even NEED to mess with building an entire site.
If all you need from your website is a small home for your online presence, with maybe a few details and links, then a landing page can do pretty much all of your heavy lifting.
This obviously wouldn't work for sites that are content-driven, as you need to have a blog and other various pages for that sort of site.
However, it can be a great and viable option for product and service-based businesses, or for anyone just starting the site building process.
For this example, let's look at this beautiful and minimal page from West Cakery (my brother and sister-in-law's wholesale dessert baking business).
They're in the process of finalizing their beautiful site after taking my Squarespace Mini Course, Square Up Your Space (you can get on the waiting list for the next round of the course right here!), so in the meantime, they've put up a simple and functional landing page as a placeholder.

Here, they mention that the site is coming soon, but invite readers to keep in touch. When you click the button, a dialogue box opens so that potential customers can write a quick email.

This is just one example of many ways you can use your landing page as a stand-alone site!
SQUARESPACE MAKES BUILDING LANDING PAGES CRAZY SIMPLE (Like, the you-can-do-it-in-5-minutes-without-any-web-design-know-how kind of simple!)
This one is going to be pretty self-explanatory as I walk you through the steps, but in all seriousness, you can build your beautiful landing page with Squarespace in LESS THAN 5 MINUTES. I kid you not.
It may take you a bit longer than that to get familiar with Squarespace's platform, but once you get the hang of it, you will absolutely FLY through the setup!
TUTORIAL // HOW TO SET UP YOUR LANDING PAGE WITH SQUARESPACE
Alrighty, are you ready? Here we go!
Let's build a landing page!
A QUICK NOTE...
First of all, if you don't already have a Squarespace membership, go to www.squarespace.com and click the "Create A Site" button in the top right-hand corner. The Squarespace site homepage changes all the time, but today, it looks like this:

The site will walk you through the sign-up process, and will help you get set with your FREE 14 DAY TRIAL!
CREATING YOUR NEW COVER PAGE
1) Once you've logged into your Squarespace account, you'll need to click on "Pages"...

Then, scroll down to the "Not Linked" section, click the plus sign, and then click the "Cover Page" option.

Then name it something cool and clever like "New Cover Page".
Or something better, if you want. ;)
2) When you click on your new cover page, you'll see that Squarespace has brought you to this design platform. We'll get into the customization of the page next.
CHOOSING YOUR LAYOUT
The great thing about Squarespace is that they've really made the process of building your site as easy as possible by taking a lot of the design process upon themselves.
When you're creating your landing page (or cover page), they've already created lots of different page layouts for you. So just choose the one you like most, and get to work editing!
1) At the top of the left-hand side of the page, you'll see a smaller image of the layout that is currently selected, with a "Change Layout" button just below. Click that button to browse through all of the cover page layouts available to you.

2) Take a quick look through the different options! The choices are almost endless, as you've got 30 different layout templates to choose from! If you find that it's too difficult to narrow down your options, take advantage of the filter menu. You'll notice that there is a small drop-down menu that says "All Layouts". Click that menu to sort through the different layout styles by type.

This can be helpful especially if you know that you have a certain goal for your page.
For instance, if you want to optimize your landing page for showing a video in the background, or to share your band's latest tracks, you'll want to choose a video or audio optimized cover page template! You can tweak all of these layouts to your liking, but it helps to start with a template that is geared towards what you're planning to do.
3) When you've found a layout template you like, hover over the image, and click the "Select" button that pops up. For this tutorial, I'm going with the Focus layout, but you can choose whichever one strikes your fancy!

Click "Save" in the upper left-hand corner, followed by "Back" to take you back to the main design editing platform.
Once you're back in the main design editing platform, you'll see that there are several sub-menus listed below your selected layout. Let's walk through all of those areas now.
BRANDING + TEXT
The first area you can edit within the platform is "Branding and Text". This is where you will edit the main body of content you'll see on the landing page. Everything from your logo and your business name, to your tagline and your mini bio reside here.
1) Click on "Branding and Text", and you'll be brought to a window that focuses specifically on editing these aspects of the page. Here I'll enter my information as I want it to appear, and it will automatically populate on the preview to the right!

Because I toggled the "Text" option, you see my name pop up as text (shocking, I know!).
2) If you'd prefer to use a logo instead of typing out your business name, simply toggle the "Logo" option. Then click "Add an Image" in the box below. You can select any file from your computer to upload, and voila! Your logo replaces the text!

(I just chose a random signature file for this illustration, but I don't like the look of it, so I'm going to click "Remove" to revert back to the text option!)
Now I'll click "Save" and "Back", and go on to the next section!
Want to build a home page that converts like crazy? Get our free guide here + learn all our top tips!
MEDIA
In the "Media" section, you'll be able to upload whatever imaging you'd like to display on your page. This can be either a photo (or series of photos) or a video file! You can also choose not to display any images at all on your page, if that's more your style.
1) To add a personalized photo to your page, once you're in the "Media" section, click on "Images", and then click in the empty box to select a file (or multiple files) to upload! If you want to choose multiple photos (they will show up as a slideshow within the image space), just use COMMAND (or CTRL) + CLICK. The click "Upload".

If you don't like the order of your multiple images, you can click to drag them into a different order!
If you decide that you'd rather only have one image, instead of multiple, you can hover over the images you'd like to delete, and click the little trash can icon that pops up to remove them.
And if you don't like the portion of the image that's showing, you can reset the "Focal Point". In the Media box on the left, hover over the image that you'd like to adjust the focal point on until you see a small white circle over the center of the image.

2) To add a video to your landing page, click the "Video" tab in the Media section. You'll see a bunch of new options pop up for you here. To choose a video rather than an image, you'll need to add a Youtube or Vimeo URL to the given box. This will add a continuous loop of video streamed from the provided link in place of your image.

You'll also notice that there are lots of customization options under "Filter" and "Playback Speed". Play around with those until you find your desired look!
You can also add a "Fallback Image" which will show up if for some reason your linked video isn't able to play! I definitely recommend doing this as some people's phones or browsers may not support video.
3) Finally, if you'd like to just keep the page clean and simple and image-free, you can click the "None" tab. Pretty self-explanatory, so I won't bore you with another screenshot here. :)
Click "Save" and "Back".
ACTION
Contrary to how it might sound, this is actually NOT where the high-intensity car chase scene plays on your page (again with the bad puns, I know, I can't help it). Rather, this section serves a really important purpose: a home for your Call To Action (CTA).
If you're not familiar with CTAs, it's basically just a place where you as your audience to engage with you and your site in a particular way. This could be a link to your latest blog post, or asking them to click to subscribe to your email list!
It's totally up to you to decide how to use this feature, but choose wisely, because it's a high-converting tool you'll be sure to want to use!
1) Click into the "Action" tab, and you'll see a screen like this:

You'll see that there are 2 different "Action Types" listed: "Buttons" and "Navigation". Below that is the "Form" option, but we'll get to that in a minute.
When you've selected "Buttons", you have the option to add up to two separate buttons linking to specific URLs.

Name your button whatever you'd like (I renamed mine to say "GET IN TOUCH", but you can make the button do whatever you'd like!), and then choose where you'd like it to send your reader when they click.
To do this, click where you see "Click to add URL...", and then enter your URL of choice in the box that pops up. You'll see that the automatic option is to add a direct link under the "External" tab.
This works just fine, but you can also add a link by clicking on the "Content" tab, and scrolling until you find the page on your site where you'd like to link your readers.
The third option here, is to click on the "Files" tab, where you can choose to upload a file that your readers can download simply by clicking on the button!
2) The "Navigation" option is similar to the "Buttons" option, but you have the ability to add up to 5 different links, and they show up as text only, rather than as buttons. You have all the same options for the links as you do with buttons, it just has a different look, depending on what you're going for.

3) Using the "Form" option can be a really good move if you want people to have the option to message you directly, share information with you, or sign up for a mailing list (just to name a few options). For this example, I'm going to remove all of the navigation and button links, and just start editing the "Form" section. First, I'll rename it "Get In Touch".
When you click "Edit Form", this box will pop up...

And then you can decide what you want the form to do. Change up the field you want people to fill out, and set which fields are required. You can add lots more types of fields when you click "Add Form Field" on the lower left-hand side of the window. You can also drag the fields around by clicking on the small dots on the left-hand side of each field's box.
Clicking over to the "Storage" tab will help you determine where you'd like the information people share with you to be stored.

As you'll see, you can have form responses sent directly to your email address, added to a Mailchimp mailing list, connected to a Google Sheet through Google Docs, or you can set up a new Zap with Zapier.
This is how you would connect your landing page with ConvertKit, MailerLite, Infusionsoft, or any other email marketing platform you might use, but it's a little in-depth for this tutorial, so I'll save that info for later.
**If you'd like to learn more about connecting to Mailchimp, Google Docs, Zapier, or any other email marketing service, be sure to leave me a comment below and I'll be sure to work on a new tutorial post all about those topics!**
Then, clicking over to the "Advanced" tab, you'll have a few more settings to choose. Here you can rename your Submit button, add a post-submit message, and input some fancy post-submit HTML.

After you've saved your changes, you can test out your form button! It should look something like this:

And that's that! Click "Save" and "Back".
SOCIAL ICONS
This one's pretty simple! When you click onto the "Social Icons" page, you'll be given the option to "Display Social Icons", or not. Toggle it on and off to show and hide the icons. When you choose to display the icons, it will only show the icons for any social media accounts you've connected to your Squarespace account. You can link your accounts in the Settings panel of your Squarespace home menu.
STYLE
In my opinion, this is the most fun part of the setup process! This is where you get to customize the page to match your business branding! Squarespace gives you a TON of customization options here, so don't let yourself get overwhelmed! Have fun with it.
The main thing you need to know when you're going to edit your landing page here is that although there are a million editing options, you can choose to only look at the options for the specific part of the page you want to edit.
You can do this by hovering over the element of the page you want to edit until you see a thin blue line form a box around said area. When you see the blue box, click to select, and the editing menu on the left-hand side of the screen will change to only show you the options for that specific element! Catch ya later, design overwhelm!

** As a note, make sure to click that "SHOW ALL" link at the top of the menu once you're done editing a specific portion of the page so that all of the style editing options are visible again! **
1) First, let's change the background color on this page so it matches your branding! You do this by clicking on the background of the page and scrolling until you see "Background". Under that header, you'll see "Color", with a small color swatch to the right. Click the color swatch to edit the color by either sliding the selector around until you find a color you like, or by entering your HEX code.
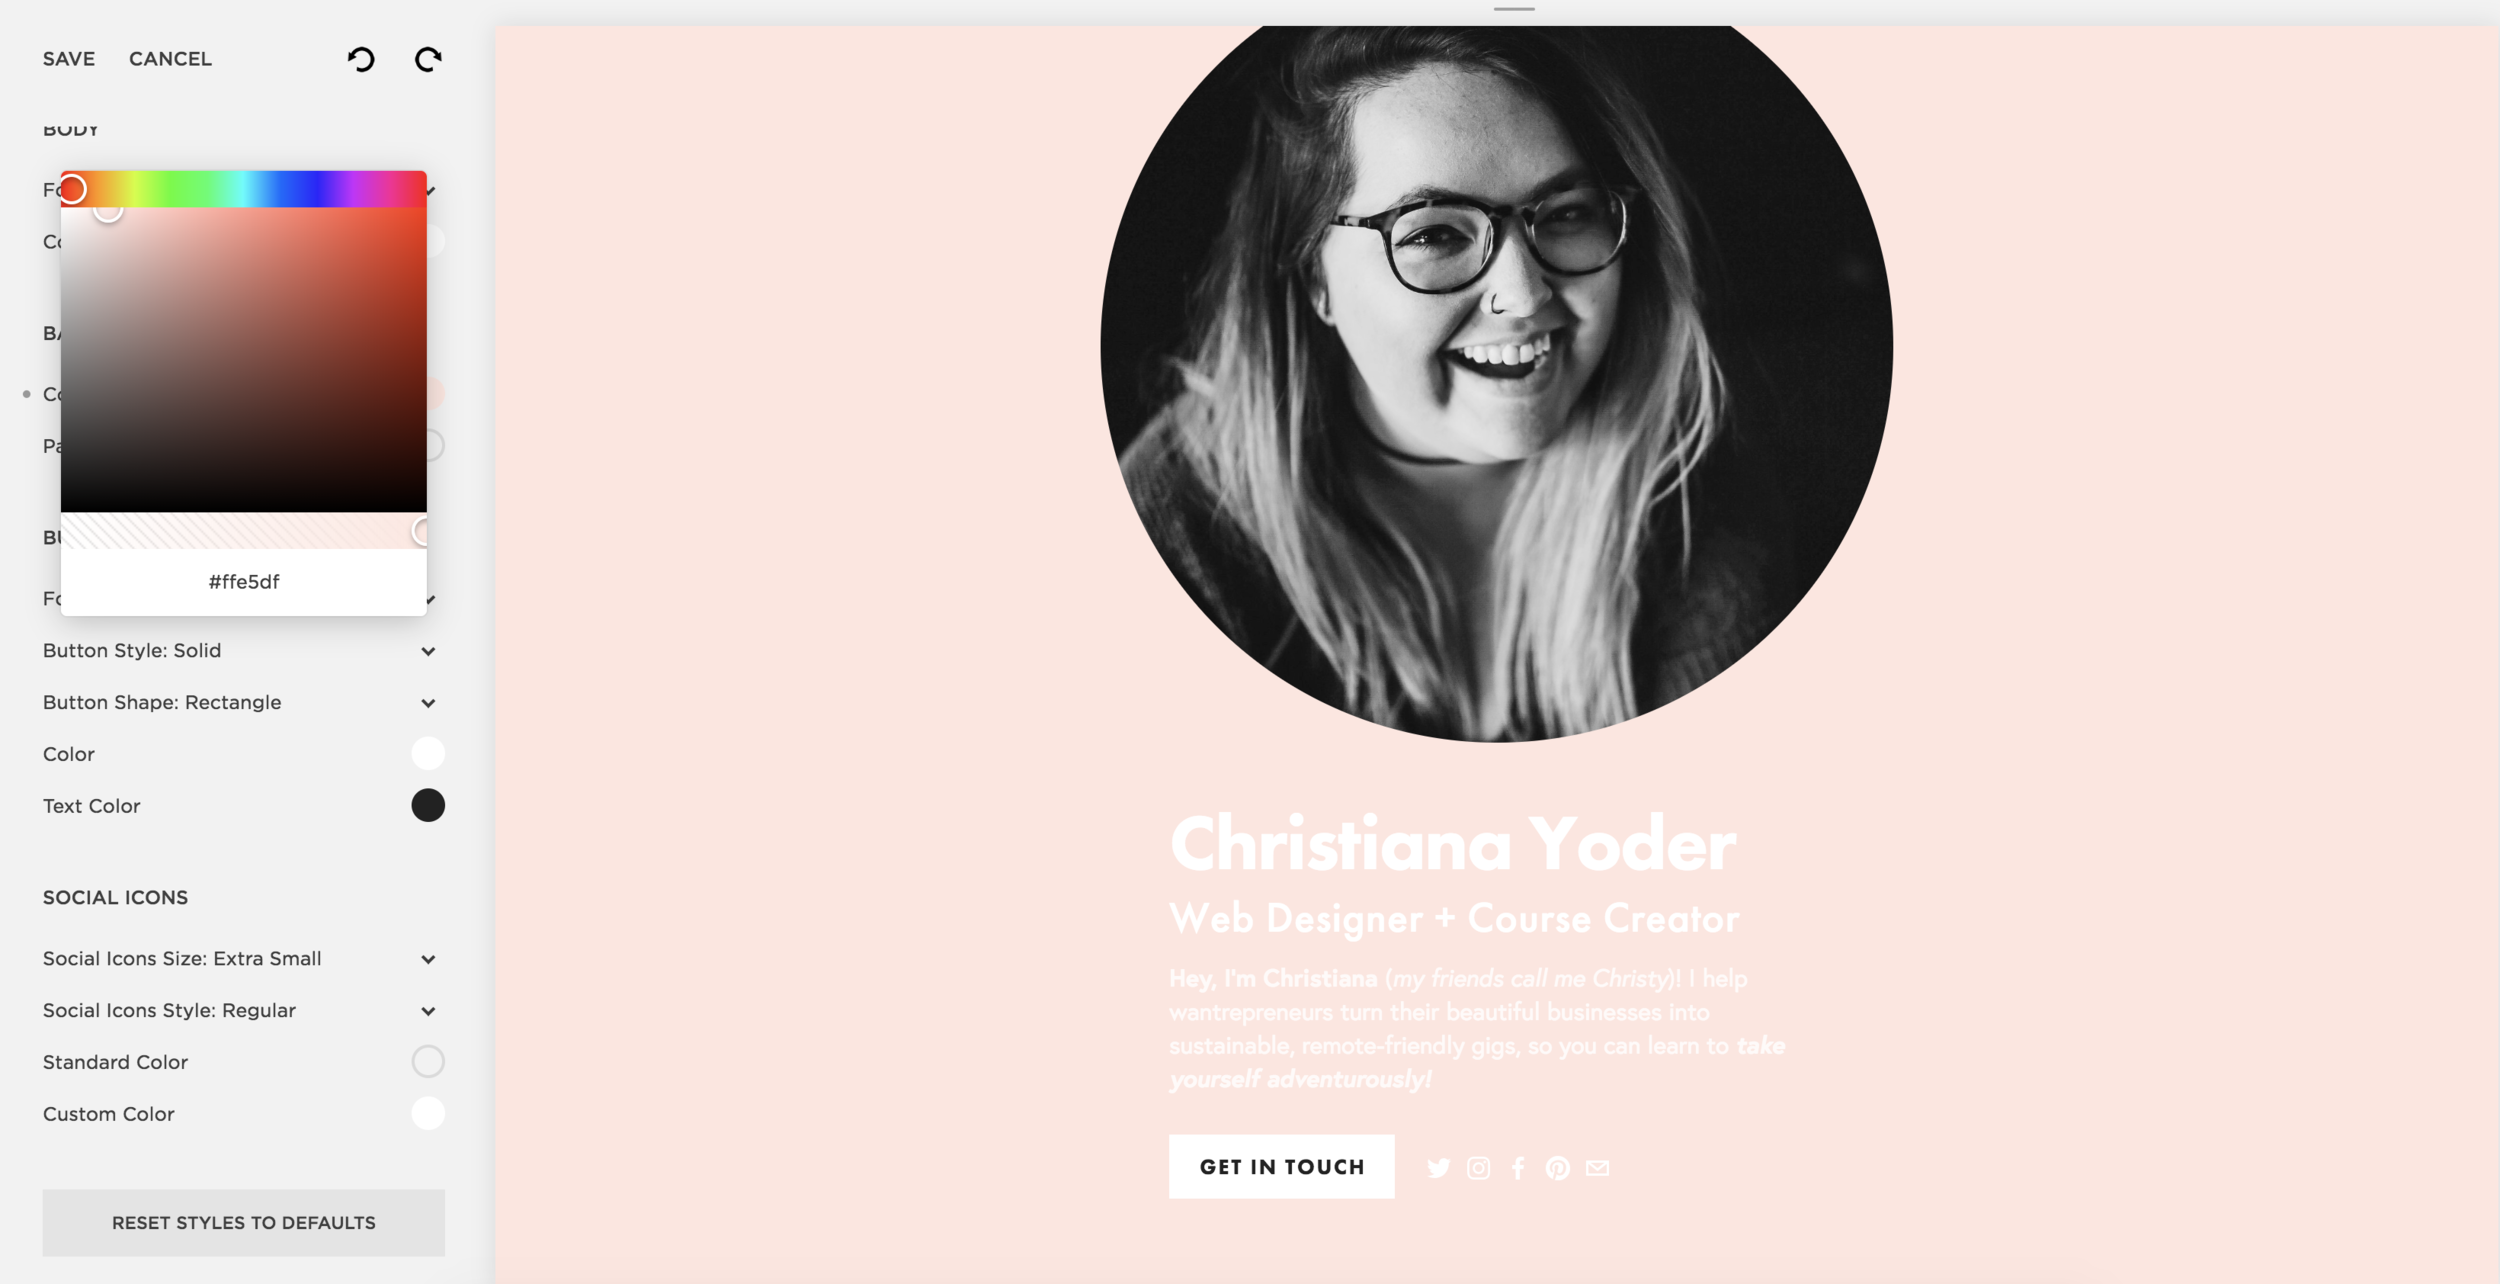
2) Now that we've got the background color changed, that white text looks much too light to me, so let's go ahead and edit the font colors! And while we're at it, we'll make any other changes to the fonts that are necessary. You'll need to edit each part of the written content the exact same way, so I'll just show you how to change the "Branding" (my name, in this case) font options, and you can do the same thing with each of the other sections!
First, I click on my name, and this brings up the editing options for "Branding". Once again I can click the color swatch to the right to change the font color. And then, when I click on "Font", I will see a number of options I can edit to my liking! Fiddle around with your settings until you find a look you like (or whatever matches your brand aesthetic)!

Repeat on the "Headline" and "Body" sections as well!
3) Now that that's all done, let's make some tweaks to the featured image. Click on the image to bring up the editing options for it, and they will pop up on the left. You'll see lots of options to edit, so play around with them until you see something you like.
For my tweaks, I added a border, changed the border width, added a custom overlay color, brought down the opacity, and removed the auto loading color. I also played around with a smaller image, but didn't like the look as much.

4) To edit the Social Icons, it's the exact same process. Click on the icons to bring up the editing options, and play around until you find a look you like. I wanted the icons to pop a little more, so I changed them to a bigger size and a bolder pop of black to make them stand out. I chose the round icons to echo the shape of the image on the page. But again, it's all a matter of taste! Get experimenting!

And last, but not least, I'd recommend clicking that "SHOW ALL" button at the top of the menu and scrolling through all the style settings to see if there's any section I missed editing.
I made a few more tweaks (changing my content alignment to center, and adding an auto-load filter), and then called it good!
Click "Save" and "Back" one last time!
MAKING YOUR LANDING PAGE LIVE!!!
The last step, now that the page is finished, is to make the page live!
To do this, click the little gear icon in the top right hand corner of the menu. Scroll until you see "Enabled", and make sure that it's selected. Then, scroll down to the very bottom of the page and click "Set as Homepage"! (Don't forget to click "Save"!)
And that's it! Your page is live, and it will now be the first page people see when they come to your site!
Whew! We did it! We just made a whole landing page!
It only took me about 5 minutes to add all the initial important items (body text, photo, links, etc), and then just another 5-10 minutes to tweak the style settings to where I wanted them.
So depending on how detailed you want to get with your landing page, you can probably spit one out in 5-15 minutes if you set your mind to it!
My main advice here is to not overthink it.
If it generally looks pretty good, leave it alone and don't do any more work on it!
I always say that the only thing better than a perfect site (which, spoiler alert, doesn't exist, by the way!) is a LIVE SITE.
So make that page live and watch it shine!
Ready to see the final product? Here it is!
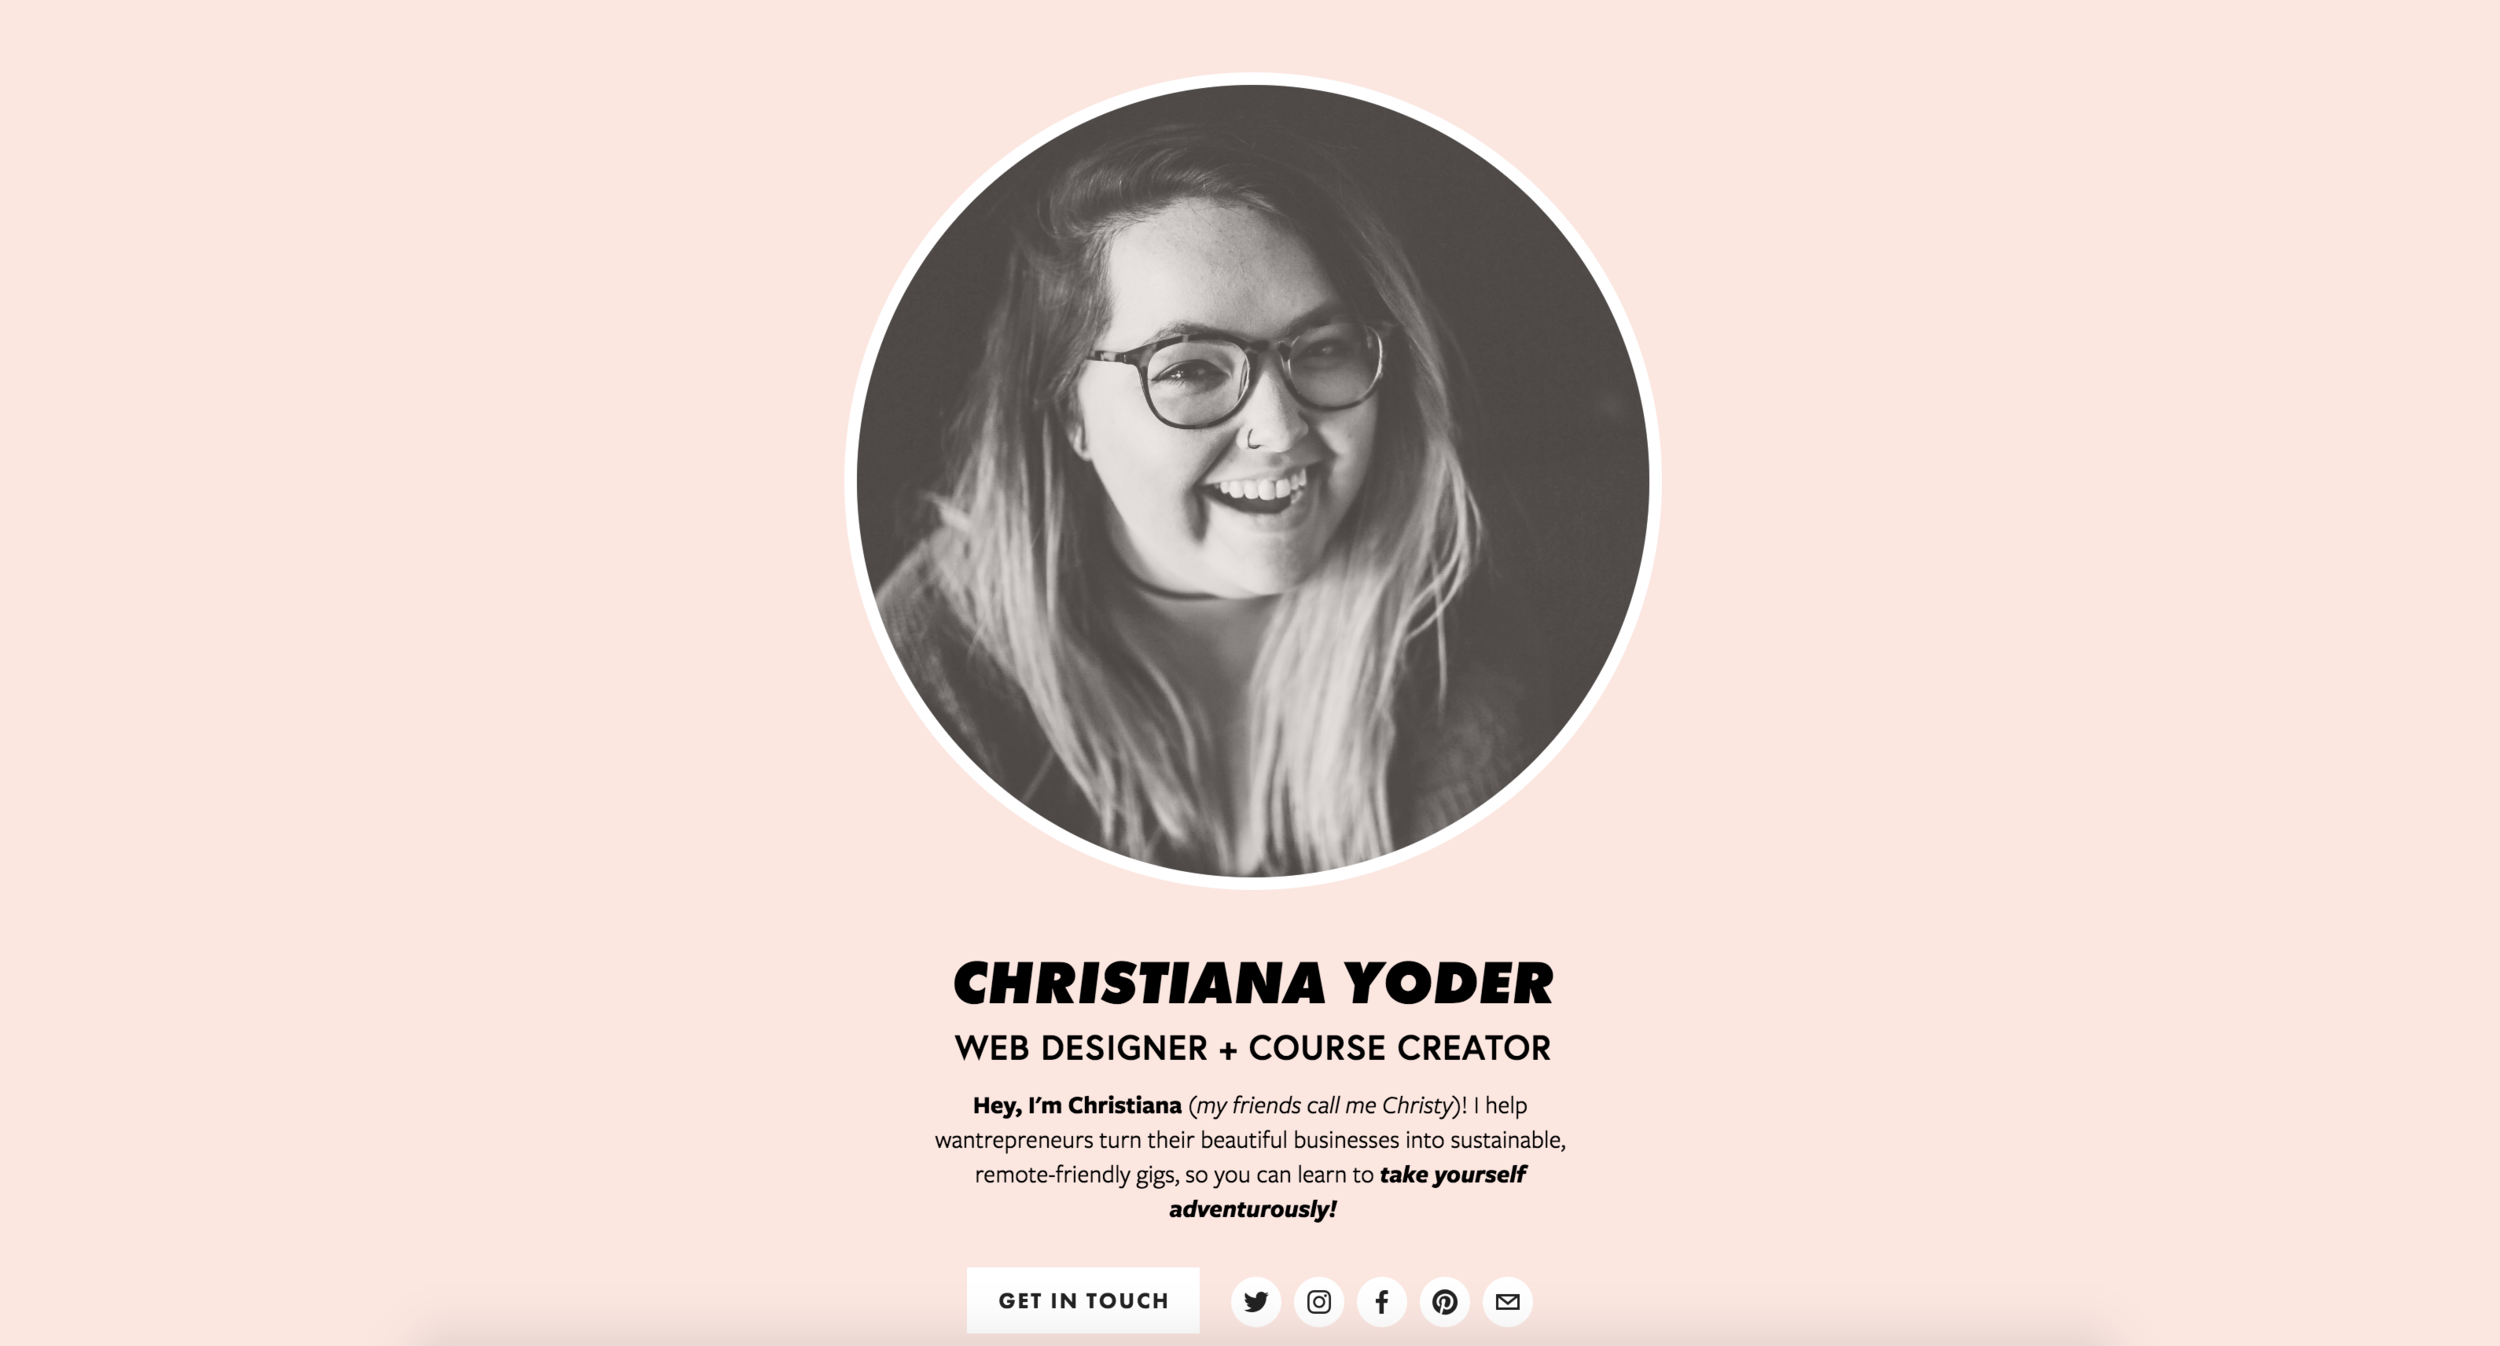
So, what do you think? Are you going to build yourself a landing page now?
If you were following along with this tutorial, I'd love to see your final products! Leave me a link in the comments below so I can take a look, and be sure to ask any questions you might have about the process! I'd love to help!
In the meantime, happy editing and don't forget to take yourself adventurously!
xo,
Christy
PS - Helping people out with building their own Squarespace sites is kind of my passion! Want to learn more about how to build your own beautiful site? Hop on the waiting list for my awesome and super comprehensive mini course, SQUARE UP YOUR SPACE! A new session is starting soon and I'd love to have you in it!
